Introduction
The lovely people over at Fishcord were hosting another event, so naturally I wanted to compete. This time around, I brought some experimental lists with Deneghra1 and Agathia, both in Scourge of the Broken Coast, but still looking entirely different.
I played Agathia in both of these rounds and, as Conflict Chamber does not currently support her Irregulars, I will be pasting the list here instead of embedding it later.
Cryx
[Theme] Scourge of the Broken Coast
[Agathia 1] Bane Witch Agathia [+29]
– Barathrum [15]
– Deathripper [6]
– Inflictor [13]
– Satyxis Blood Priestess [0(4)]
Darragh Wrathe [9]
Severa Blacktide [0(6)]
Asphyxious the Sanctified [14]
– Toro [13]
– Toro [13]
Bane Knights (max) [15]
– Bane Knight Officer [0(4)]
Black Ogrun Ironmongers [6]
For completeness’ sake, here’s the Denny list as well:
Cryx
[Theme] Scourge of the Broken Coast
[Deneghra 1] Warwitch Deneghra [+26]
– Barathrum [15]
– Deathripper [6]
– Nightwretch [7]
– Doctor Stygius [4]
Axiara Wraithblade [0(6)]
Boomhowler, the Destroyer [8]
Death Archon [8]
Death Archon [8]
General Gerlak Slaughterborn [0(6)]
Misery Cage [2]
Blighted Trollkin Marauders (max) [15]
– Jussika Bloodtongue [0(5)]
Cylena Raefyll & Nyss Hunters (max) [16]
Satyxis Blood Witches (min) [8]
– Satyxis Blood Hag [4]
Now, off to some game reports.
Round 1
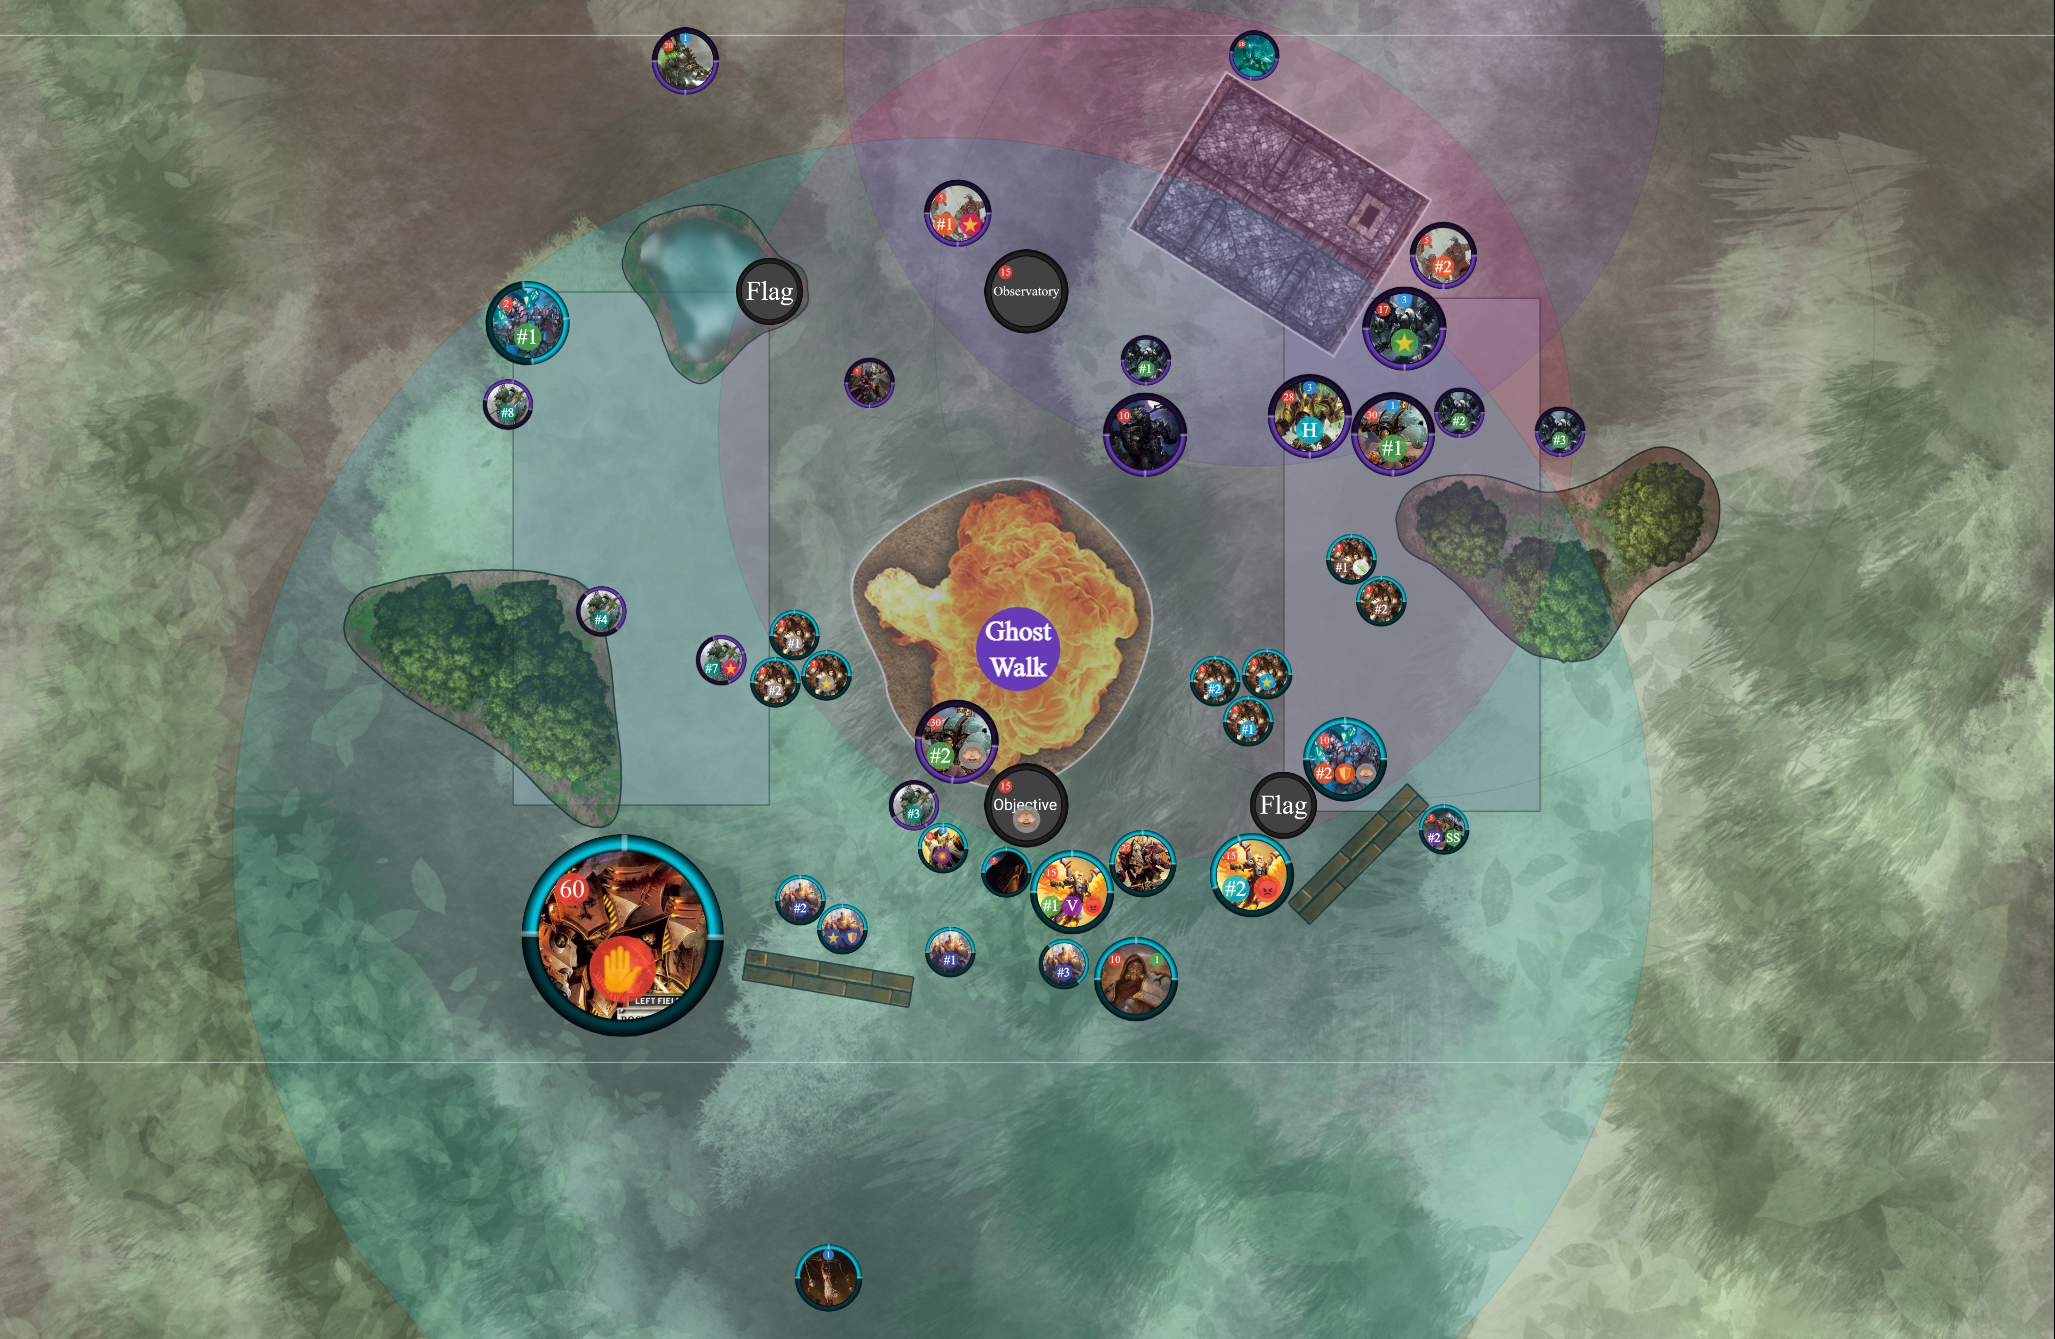
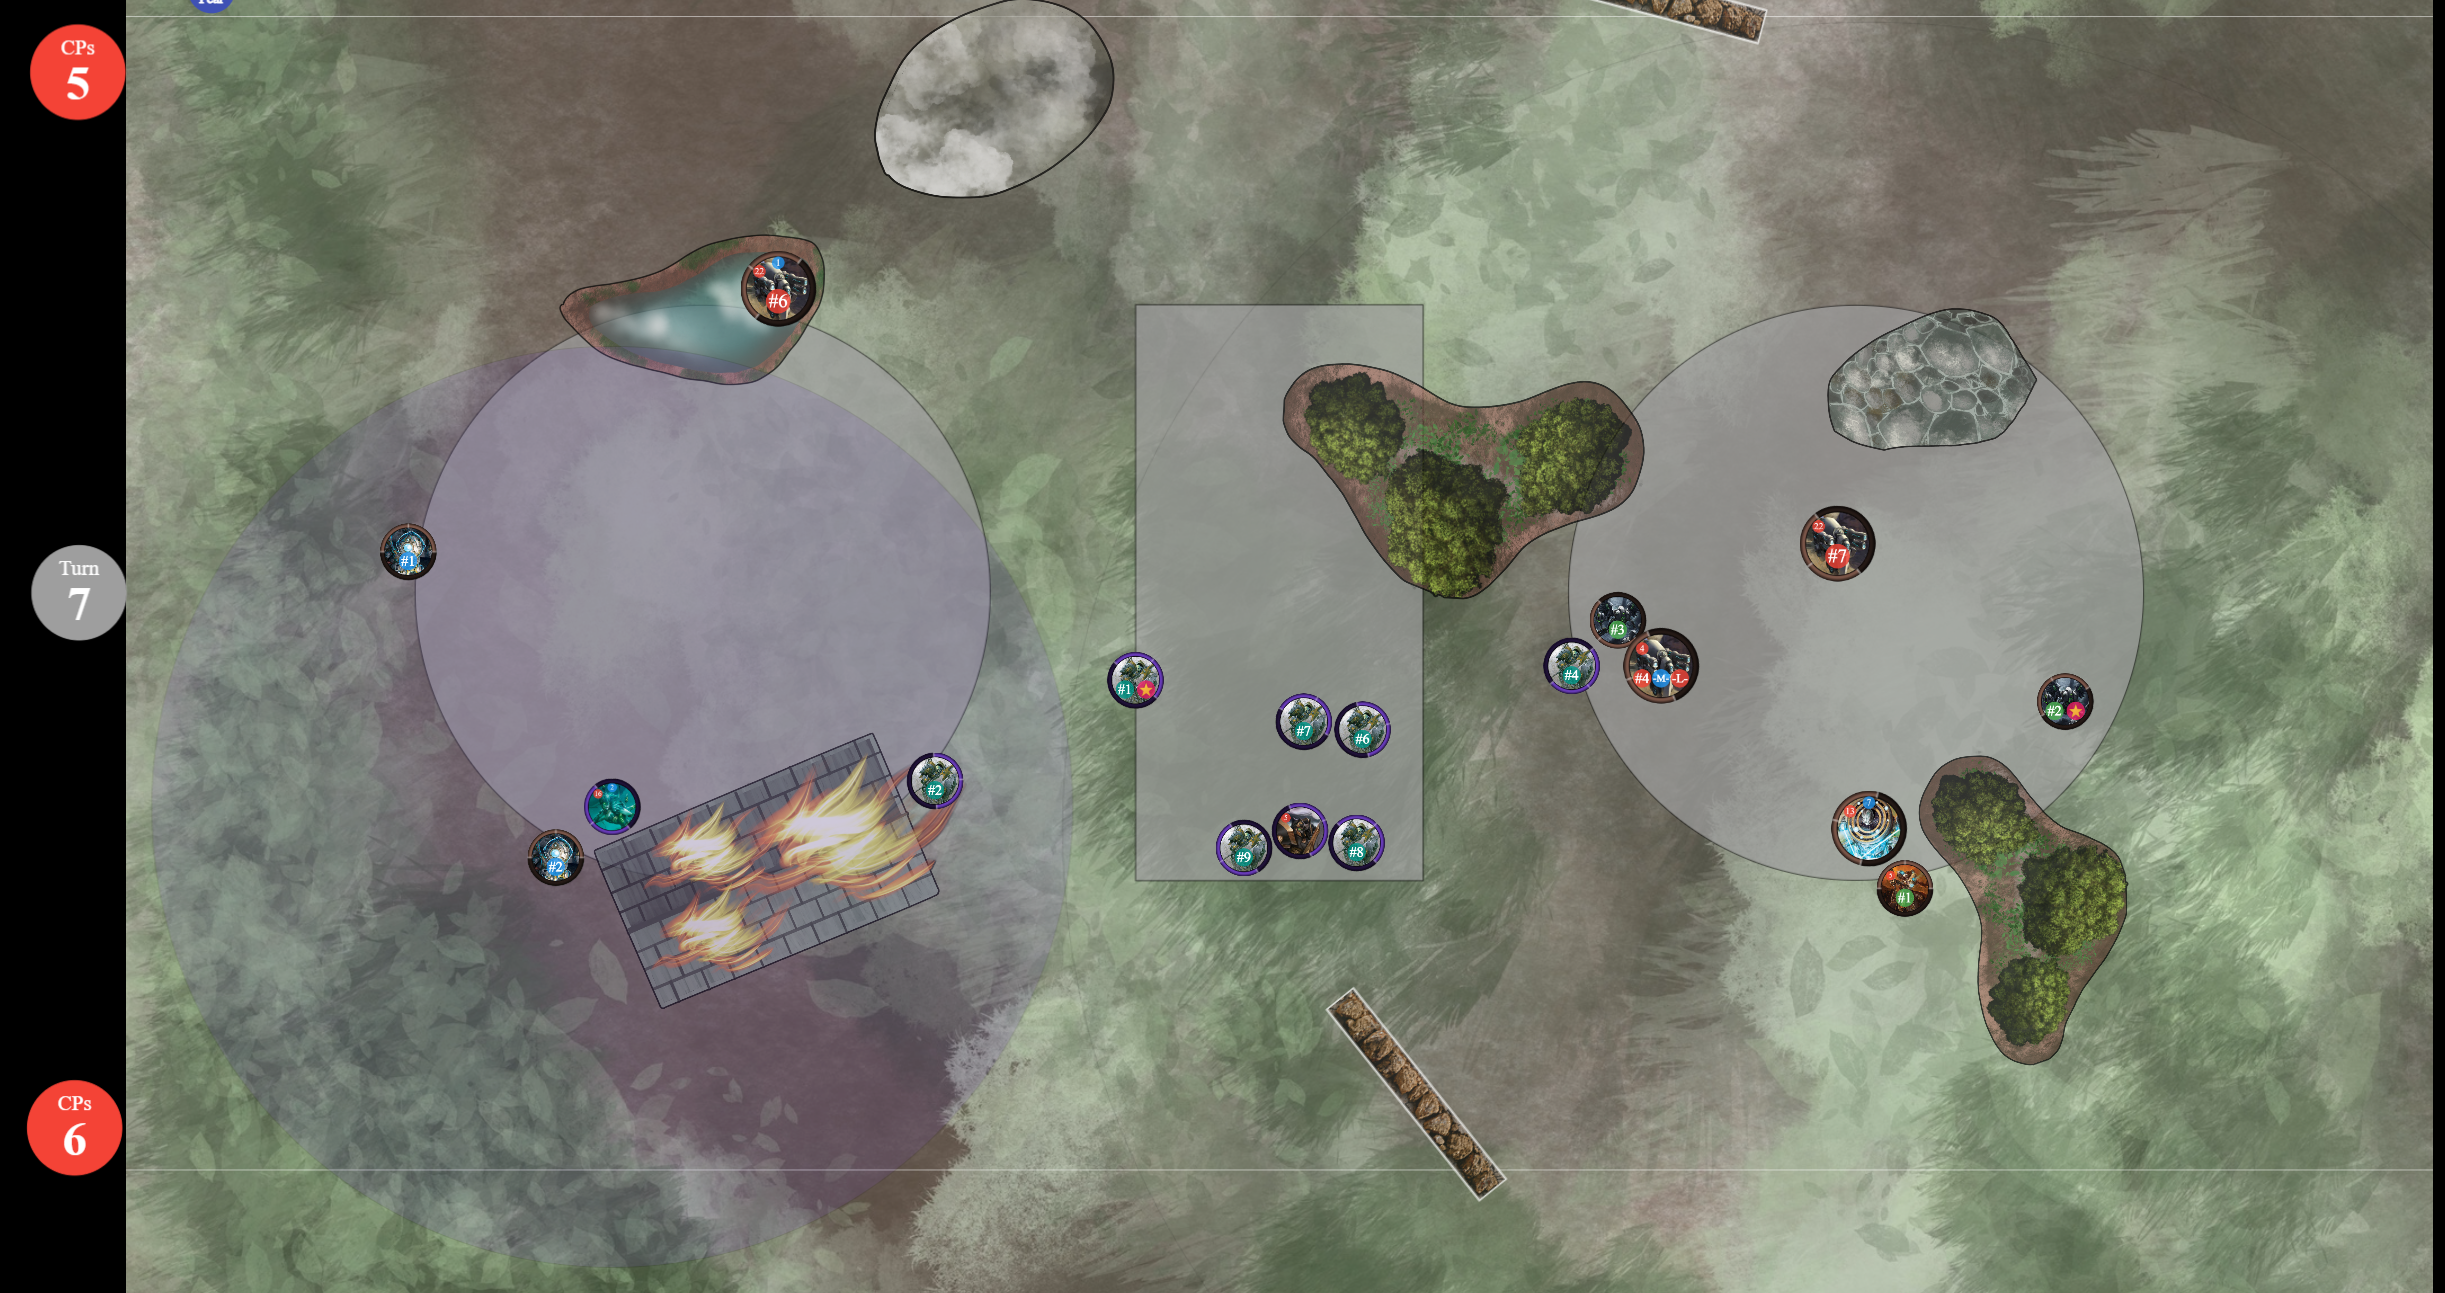
Agathia vs Severius1 (Picture at the end)
I win the rolloff and elect to go first; the scenario is relatively slow and I figured seizing initiative would benefit me more than scoring first. My opponent picks the bottom side, because the top is actually very annoying for his colossal. This is perfectly fine by me as I could use the central terrain pieces to make a wall with Asphyxious, hide things behind the house, and, most importantly, don’t have my objective stuck inside a massive cloud. The reason I found this so important was because that objective would always be a beacon to charge stuff at, which now I won’t have to deal with.
We both pick the Observatory for Eyeless Sight.
On the first turn I move up as far as possible, which is actually not as far as I would’ve liked, because I forgot about Apparition. Normally this wouldn’t have been such a bad thing, but as my opponent pointed out after the game, this meant that the Knights didn’t get to the zone that turn, which makes it a bit easier for his Judicator to move up. Agathia simply casts Hellwrought on Barathrum and charges forward. Everything else goes up as far as possible, as long as they can stay outside 19″ of the Judicator, which is the threat range of his rockets. Barathrum ends up just in front of the objective with the Inflictor about next to him.
In return my opponent casts Vision on one of the Archons and Defender’s Ward on a Champion. Everything moves up, being careful to stay mostly out of my range.
On my turn 2 I think I can use my feat to take out the Warded Champion without too much retaliation by using the feat placement and Drag Below from Barathrum. While we’re at it, I figured I can use Bloodthirst to have my Inflictor also charge it and get a few hits in on Blessing of Vengeance, hopefully crippling it, because for some reason I always think an Inflictor has Chain Weapon to ignore the shield. Why doesn’t it anyway?
Agathia allocates both her heavies to full focus, feats, and positions in between some of her other troops, with the help of Vanish and the feat, to peek out from the corner out of the house.
I make the charge attack with the shield on the Champion and do nothing, while doing a handful of damage with the Stinger on Blessing, and tend to always forget that he has a Repulsor Shield, so that kills that plan. I also realize that I can’t really get a Gang Fighter model to the Champion and that 15/22 might be a bit too hard for Barathrum to one-round, especially if I also have to deal with the dismount. So I relocate the Inflictor to engage as much as possible, let Asphyxious build a cloud wall between the forest and the burning earth, and move the Toro and Barathrum in front of him, because I don’t want hem to get spelled to death.
Darragh moves up with Mortal Fear and the Knights fan out to hopefully not have too many casualties from the Judicator, the Officer also pops Serpent’s Coil for if the Allegiant or Initiates on that side were to get any ideas. One of the Toros is just off to the side behind them, to maybe even get a counter charge off. Everything has Stealth because of the feat.
On my opponent’s turn the Initiates on the left move up out of range of Defensive Strikes or Counter Charges and the Judicator kills some Banes with sprays. He also gets some good drifts on the rockets, which takes out the leader of my Ironmongers, as well as the Blood Priestess, and my Bane Knight Officer, who was actually rather far back. The left-side Champion also has some good rolls and kills a Knight or 2. The Allegiant walks into Defensive Strike range of a single Bane without a care in the world and gets slapped for his insolence. Unfortunately he succeeds his Tough roll and goes back into Shifting Sands Stance.
The Inflictor gets hammered into scrap even with the additional protection of Mortal Fear, but not before being allowed to take a free strike on one of the Inititates and killing him. This angered the Archon which then finished off the Inflictor for the transgression.
The Judicator gets the song of “no spells” sung by the Choir, same as last turn.
When all is said and done, Severius has moved up behind the cloud to catch Agathia within 16″ of him to feat and my opponent scores one on his flag against my 0.
So now most of my Bane Knights are dead, but at least I don’t forget about Apparition. I’m starting to feel uncomfortable about my chances at attrition, but in wanting to catch Agathia, who is now only at 5 focus, in the feat, Severius is at exactly 10.2″ of the Toro in the middle, which normally would be safe, but that’s without counting Bloodthirst… He’s also camping three and the Hermit is right besides him. I can’t shoot the objective because Blessing of Vengeance also happens to be a Shield Guard, but Sevvy himself is out of range of any such protection.
I figure the assassination is my best option, as I can also get a Bane Knight to charge after Apparition, and could even walk Darragh there if it were to come down to it. I give Eyeless Sight from the objective to the Toro, of course. It’s a good thing that I had feated the turn before, or my objective probably wouldn’t have survived the colossal’s onslaught of rockets.
Agathia allocates to Barathrum and Apparates backwards so she can cast Ghost Walk on the Toro, then moves behind the house in case it all goes wrong. I needed to move because Severius’s feat prevented me from casting anything. The few remaining Bane Knights use Apparition to move up, 2 will charge the Champion, 1 in the back arc of the monk, the Leader goes for an Initiate and 1 gets to Sevvy. Before that happens, Severa moves up and uses Ghost Shot twice to shoot at the opposing Warcaster, but misses her first shot, then deals 2 damage on the second. Alas, no Chain Attack. The Bane Knight actually rolls a respectable 13 damage, at straight dice, which gets reduced to 8 by spending a focus to overboost the power field. Sadly there is no way to get the Ironmonger leader in range of Severius to Curse, so the Toro will have to go in needing 6’s to hit.
I make the charge attack with the shield to spread the damage potential and hopefully bait out an early Mad Visions. Both the charge and the following sword attack roll a 5 to hit, but the 2 bought swords connect and, at dice +8, the one that didn’t get Hermitted puts Sevvy in the dirt. Lucky for me, because it was only after this I noticed that I misplaced the Toro and he was blocking off Darragh’s potential followup, and he wouldn’t have been able to cast spells due to the feat. So I would’ve had to get pretty creative to kill the objective and get it out of the way, but luckily it wasn’t needed.
I actually came back to this game to have another look afterwards, and I noticed that attrition may not have been so hopeless as I had first thought.
My Ironmonger could Curse one of the units of Inititates and it’s likely that I could clear all but the monk in the right zone, as well as one of the Archons and hopefully bang up Blessing of Vengeance. Then if my Bane Knights went ham on the left Champion and killed it, there’s no way that my opponent would’ve ever scored that flag, so I could withdraw the rest of my forces to the right hand side. The cloud would serve to keep Agathia, as well as basically my whole army, safe from the Judicator for at least another turn. Then my opponent would have to deal with 3 heavies and Asphyxious, all protected by Death Shroud and possibly Mortal Fear. I could use Severa to score my own flag and then we would be able to drag out the game to an attrition slog that had a decent chance of turning out in my favour.
Round 2
Agathia vs Orion
This one was very difficult for me to decide on what to drop. My opponent had Orion paired with an Axis Negator spam list that also included Asphyxious with a Blockader. I eventually figured that if I were to drop Deneghra, I would have a hard time shooting valuable targets because of Asphyxious’s clouds, hence I settled on Agathia to see how much I could take on the chin while hopefully wearing down my opponent.
I lose the rolloff and thus get to choose sides, so I pick the top to hopefully make good use of the forest to make it a bit more difficult for my opponent. I know Mage Sight is a thing, but it still costs focus to cast. The cloud on my left could also be useful and frankly the house at the bottom was going to be a pain, so it was a relatively easy choice.
I take the objective for Eyeless Sight, so I can at least send something in through the opposing cloud wall, and my opponent simply picks the tried and true D3 heal.
I end up feating on the bottom of turn 1, to hopefully protect myself at least a little bit. I also sacrifice the Deathripper to get a good Hellfire out on the Stalker that was behind the forest, and Hellwrought goes up on Barathrum as always. My opponent still manages to cripple one of Asphyxious’s Toros, as well as dispose of my arc node, and he didn’t even have to feat yet. He withdrew the Stalker to get it repaired and then walls off the mechanics with his other models. This was actually a great move as I had been looking at sending in the Toro with the help of Bloodthirst on those few living models. Of course, I lose my cortex to his shooting, so that idea was out the window, but still a good play on his part.
After that I send also my Toro back for a pit stop and send my Knights into the zone on the left to hopefully clear it, while engaging the counter charging Servitor that was lying in wait just outside it. I manage to clear Gaspy’s murder bot, but leave the Tesselator on a handful of boxes.
The Knights then put up Serpent’s Coil, because you never know. Everything else attempts to stay relatively safe, while still contesting the zones.
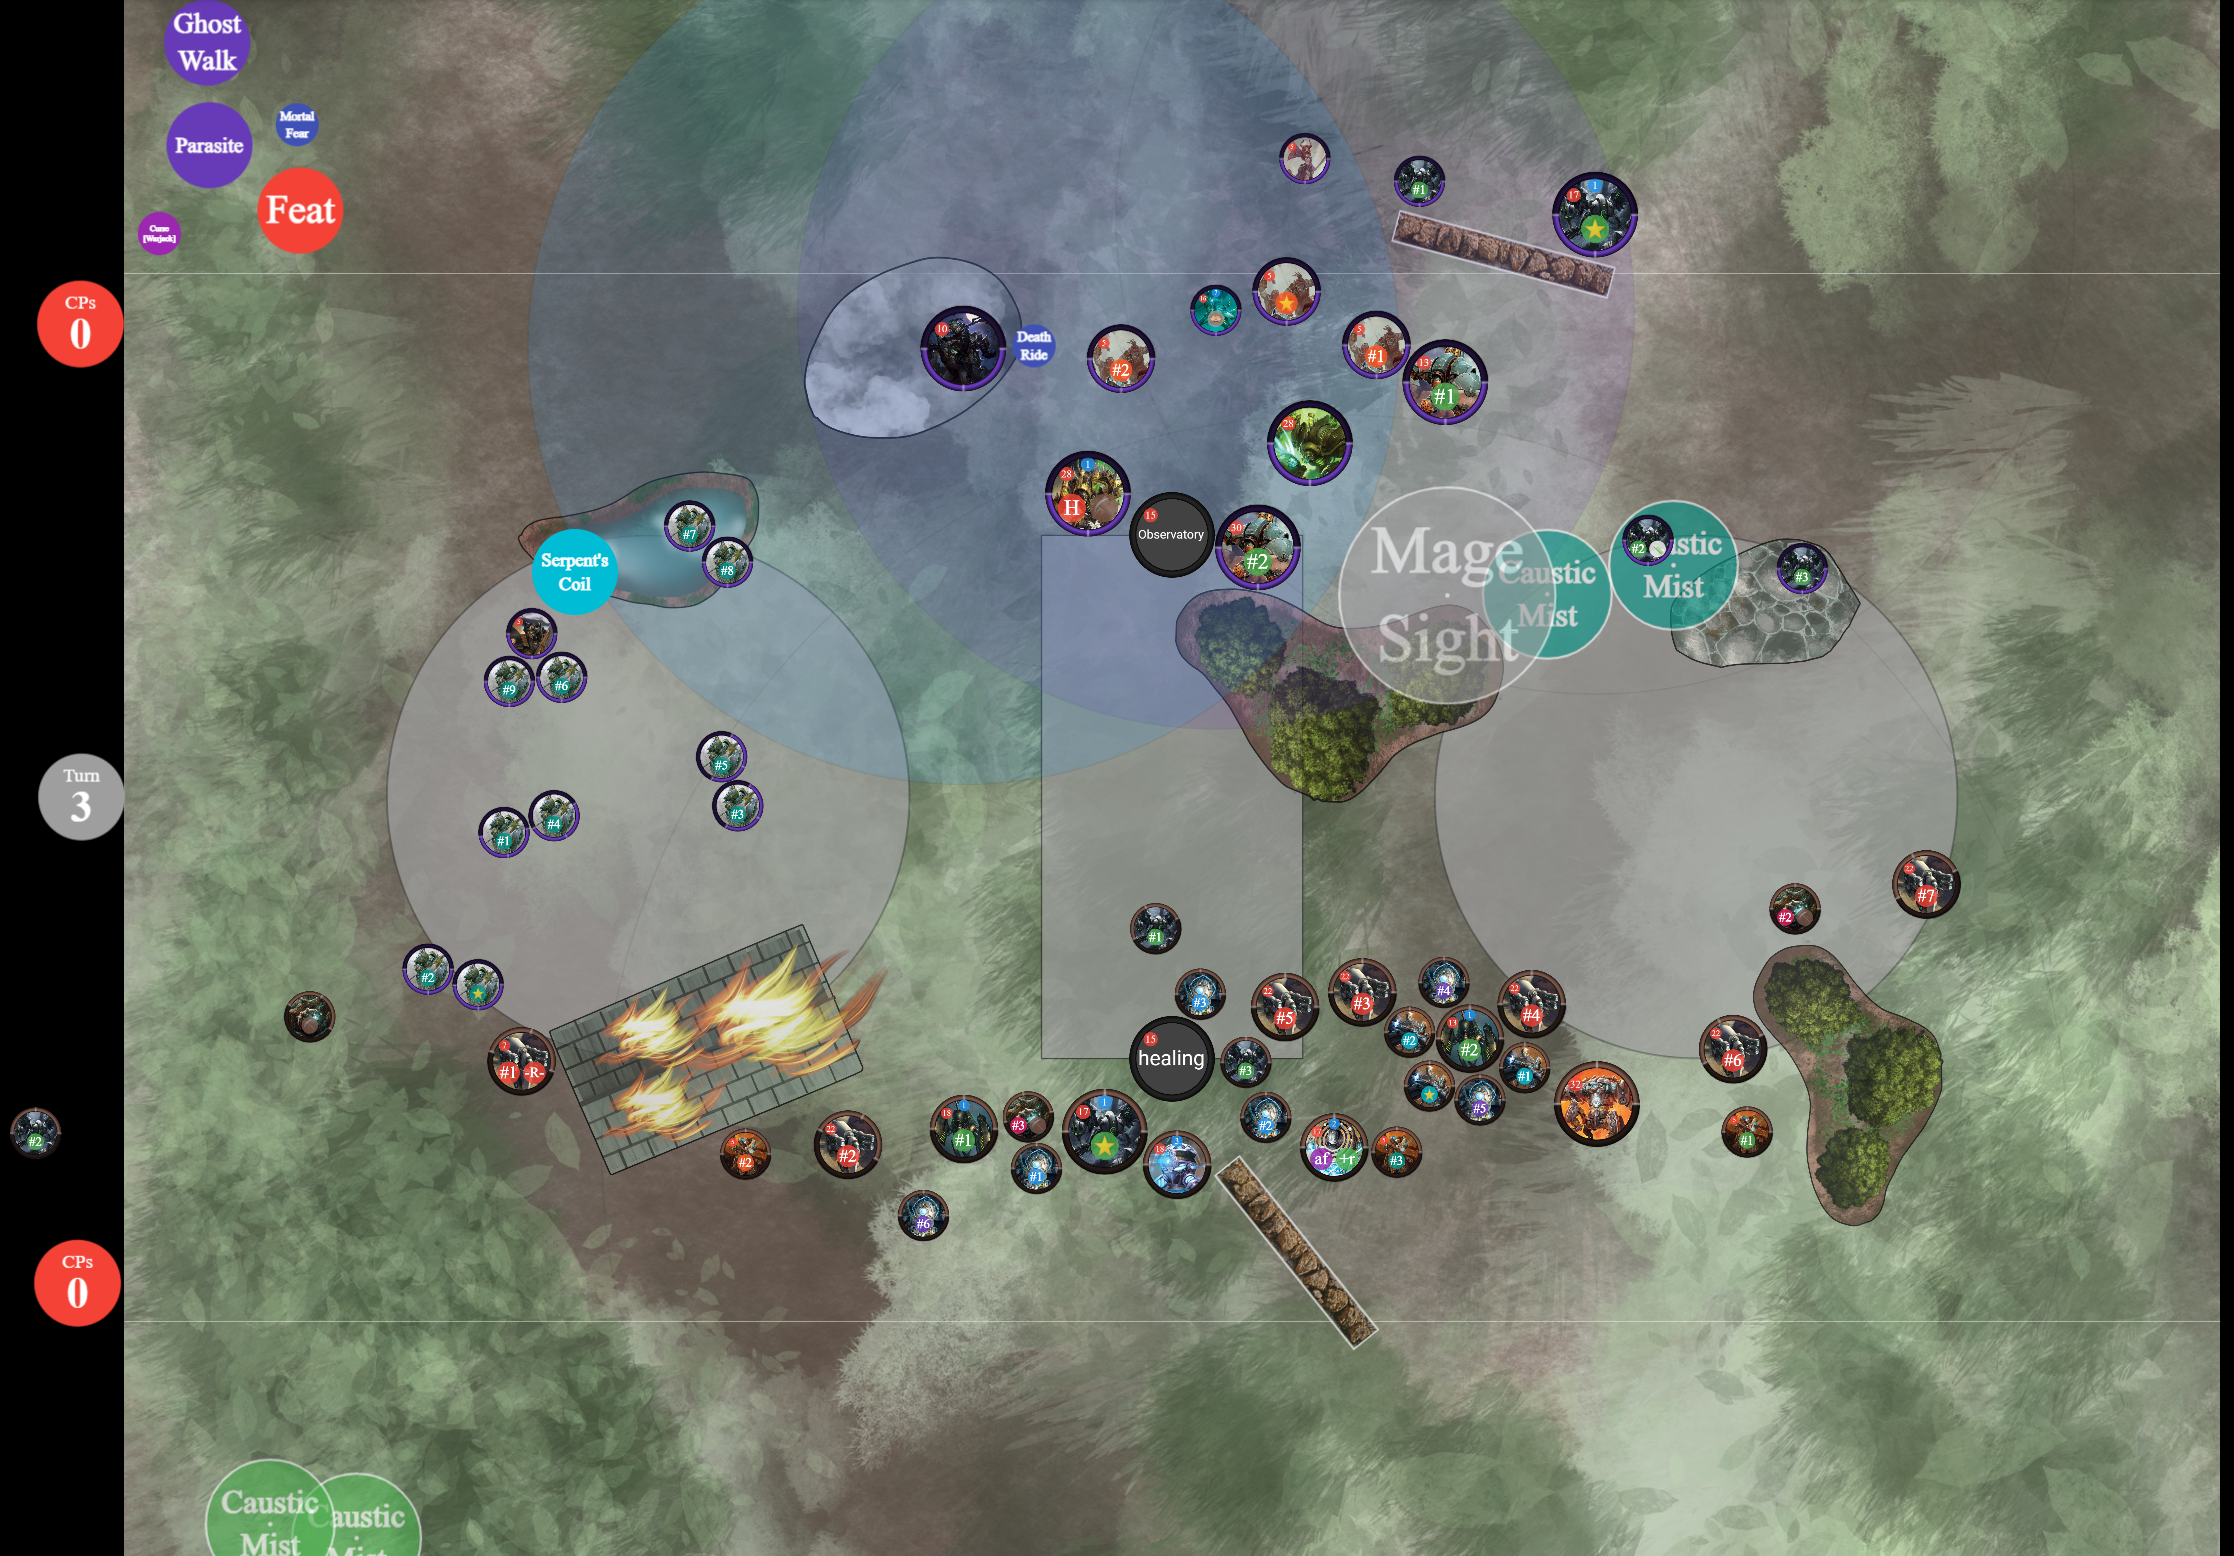
My opponent then responds by feating and using one of his arc nodes to put a focus on the Toro, for the extra damage, after which both Toros and my objective get taken off the table. Mage Sight is definitely a thing. I actually really messed up here as Orion had shot my objective with his gun, which pushed Barathrum out of the zone, and also made him drop Dig In. I could’ve shield guarded, but I was momentarily not paying attention, and by the time it occurred to me, it was already too late.
The two bots that I had put into the zone are of course not that hard to kill and so my opponent scores 3 against my 0. I’ll really need to start pulling something out of my… hat.
I allocate and cast Ghost Walk on the Inflictor because I need it to at least take out the Stalker and then go be annoying. I leave Agathia in the back, devoid of focus. Then I use one Asphyxious’s buddies to go trigger Gang Fighter while he himself attempts to take out the other Stalker, hopefully with enough focus left to then Flicker into the rubble. I send in the second bot as well, because I might as well, even though it can only deal 1 damage. Asphyxious boosts his charge attack, needing an 8, and rolls a 7, so I buy and boost again with the same result… Flicker is now out of the question; so I buy and boost my last attack, finally rolling an 8 and leaving the Stalker on 1 box. I did take out its movement system though, so it’s a good thing that I sent in the Servitor as well, as it can finally dispatch the traitorous Bonejack.
The Inflictor fares slightly better and takes out its opponent rather easily.
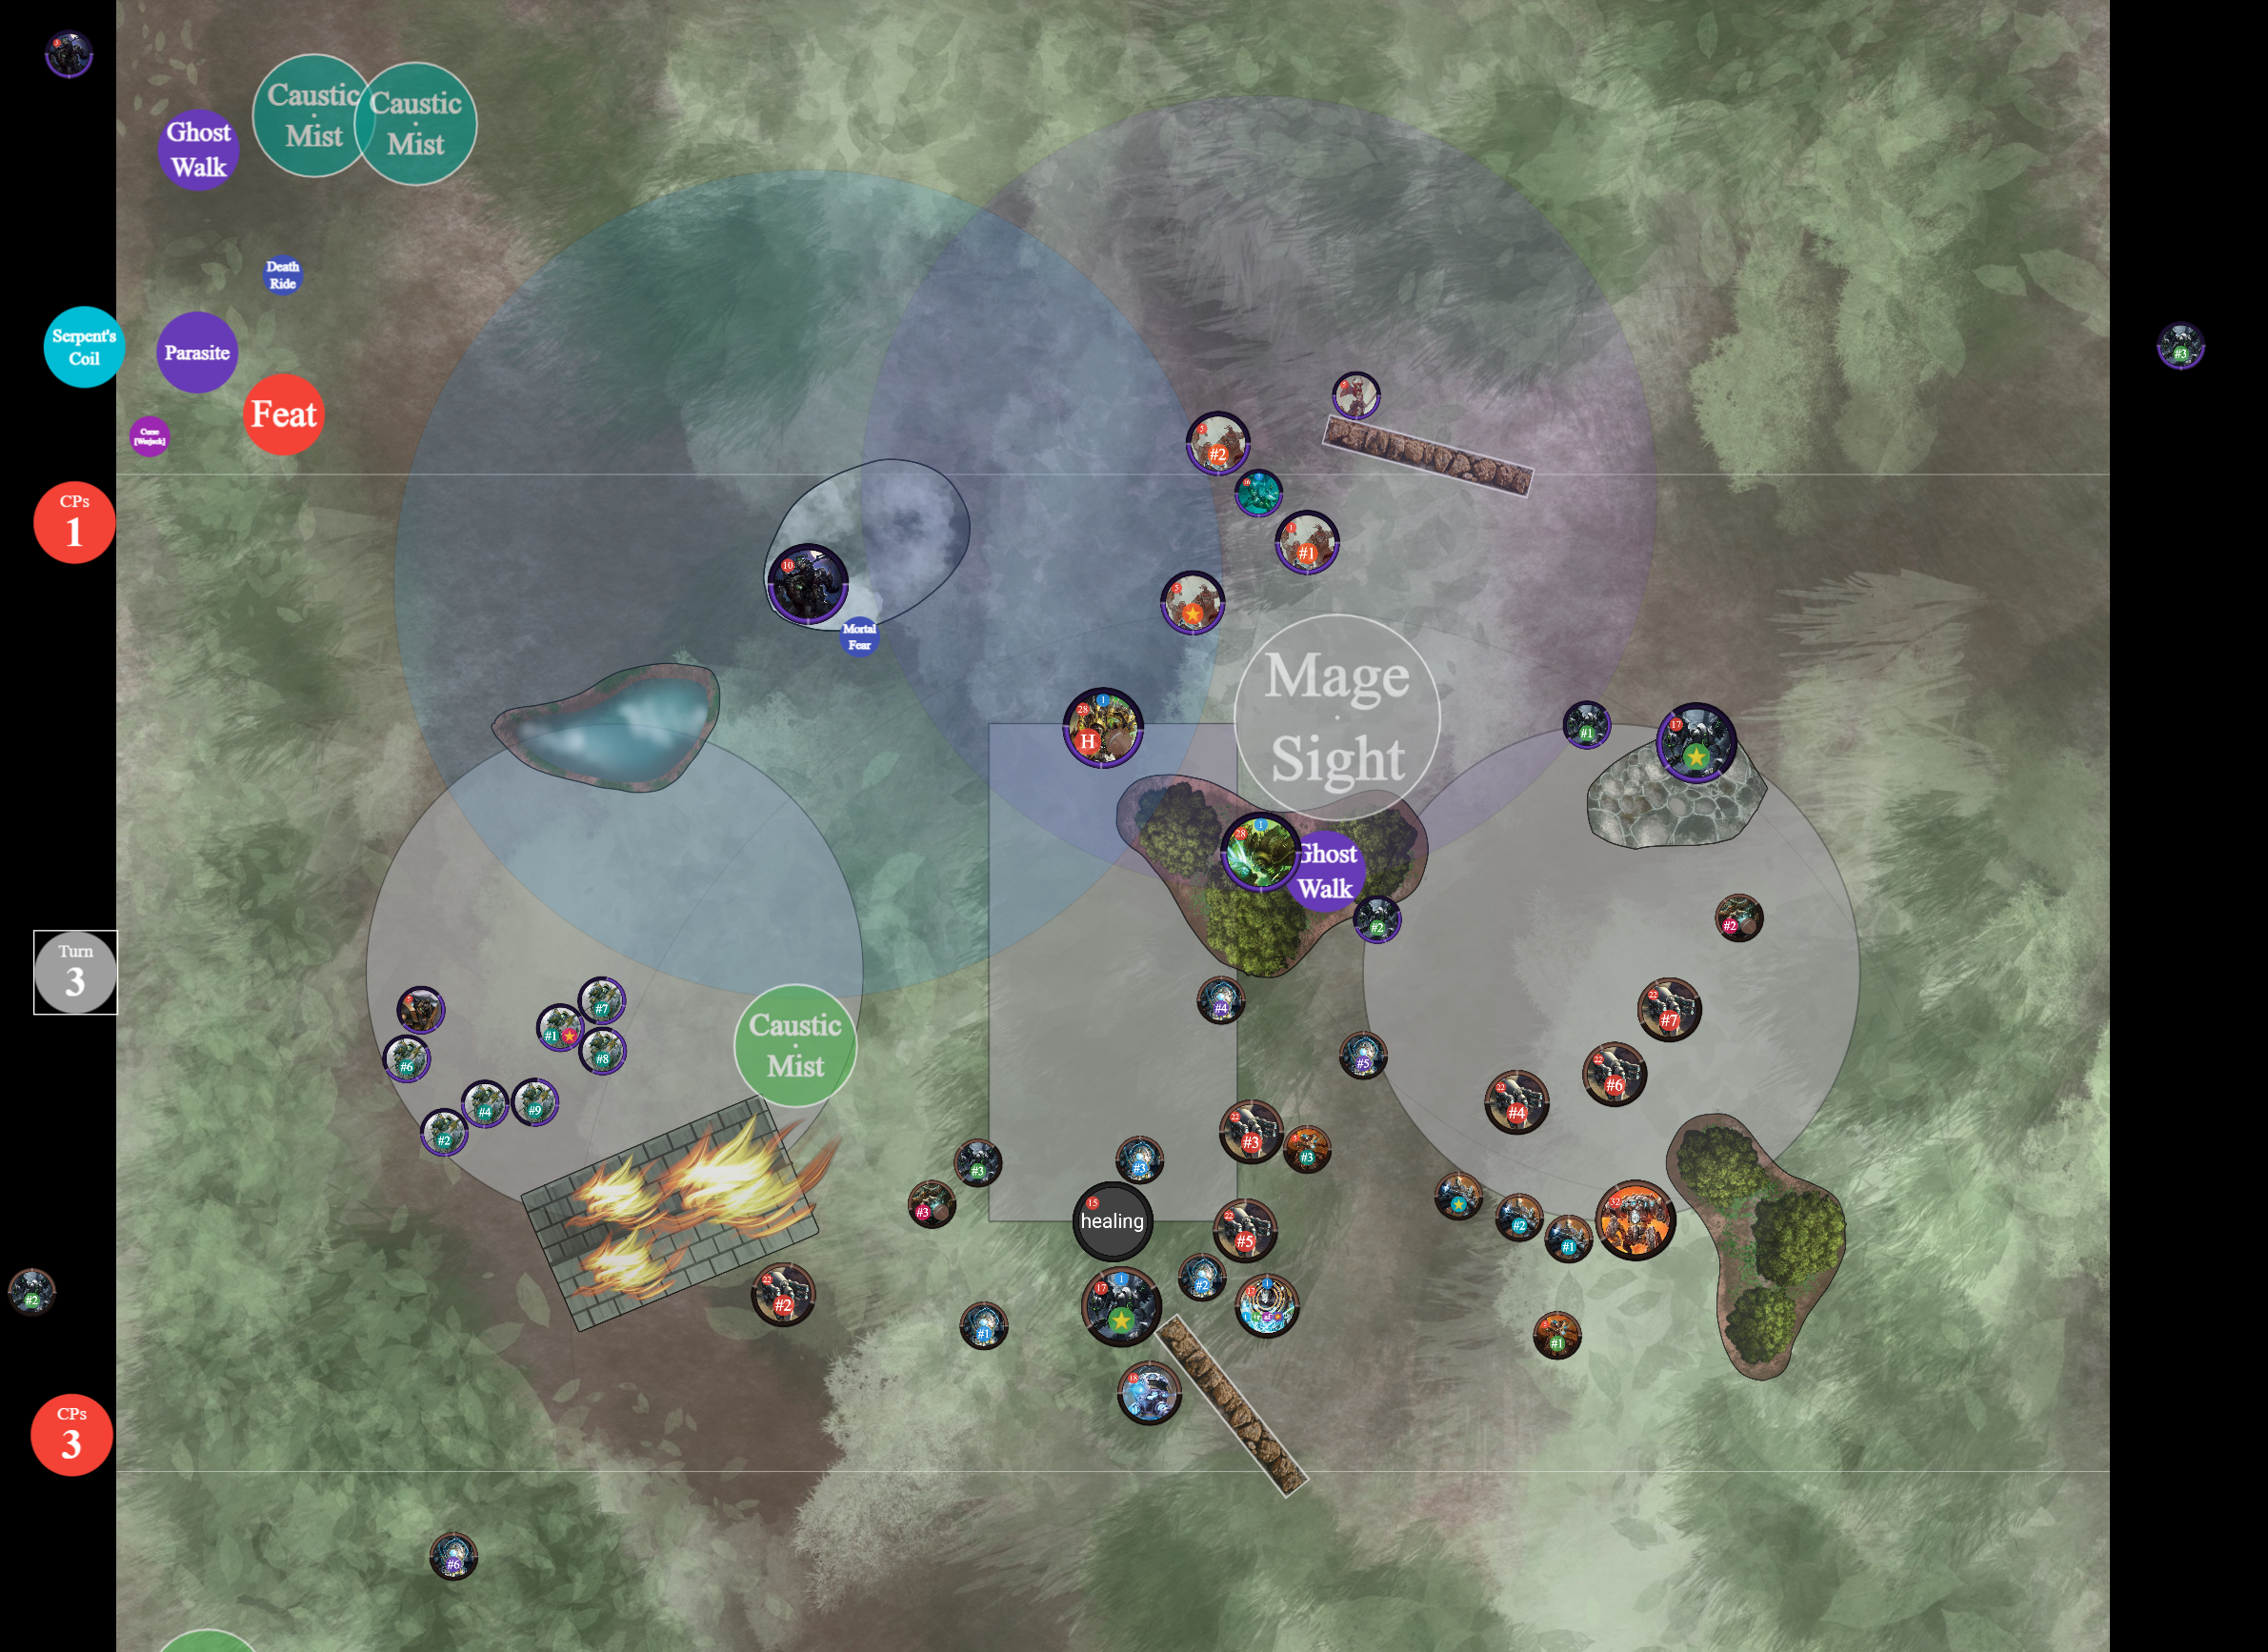
There are only a few more noteworthy things that happened during the rest of the game. One of them was definitely that Asphyxious the Sanctified on the other side of the table failed to take care of my Inflictor that was in the way. Rolling sixes is hard, after all. The Inflictor in turn manages to take out Gaspy, with the help of Darragh to deal some damage as well as provide Gang Fighter.
The Knights continue to fare well on the left hand side, because their DEF 14 ARM 18 is actually not easy to deal with for Tesselators, even if they are base RAT 7. Eventually Agathia relocates to that zone to start scoring it, so my Banes can focus more on murder.
Barathrum continues to take a lot of punishment throughout the game. It helped that my opponent forgot all about Spell Piercer, and that the Monitor that charged was only a whopping MAT 4.
I keep the Blood Priestess safe behind the wall for a while, but then foolishly put her in the zone while somebody else was already contesting it, which just got her shot to pieces for no real reason.
A dismounted Darragh was contesting the zone in between the remaining mechanics with Mortal Fear up and engaging a Tesselator. Somehow my opponent’s dice decided that that point in time would be a good one to make up for the atrocious rolls of Asphyxious earlier and Darragh Wrathe was no more.
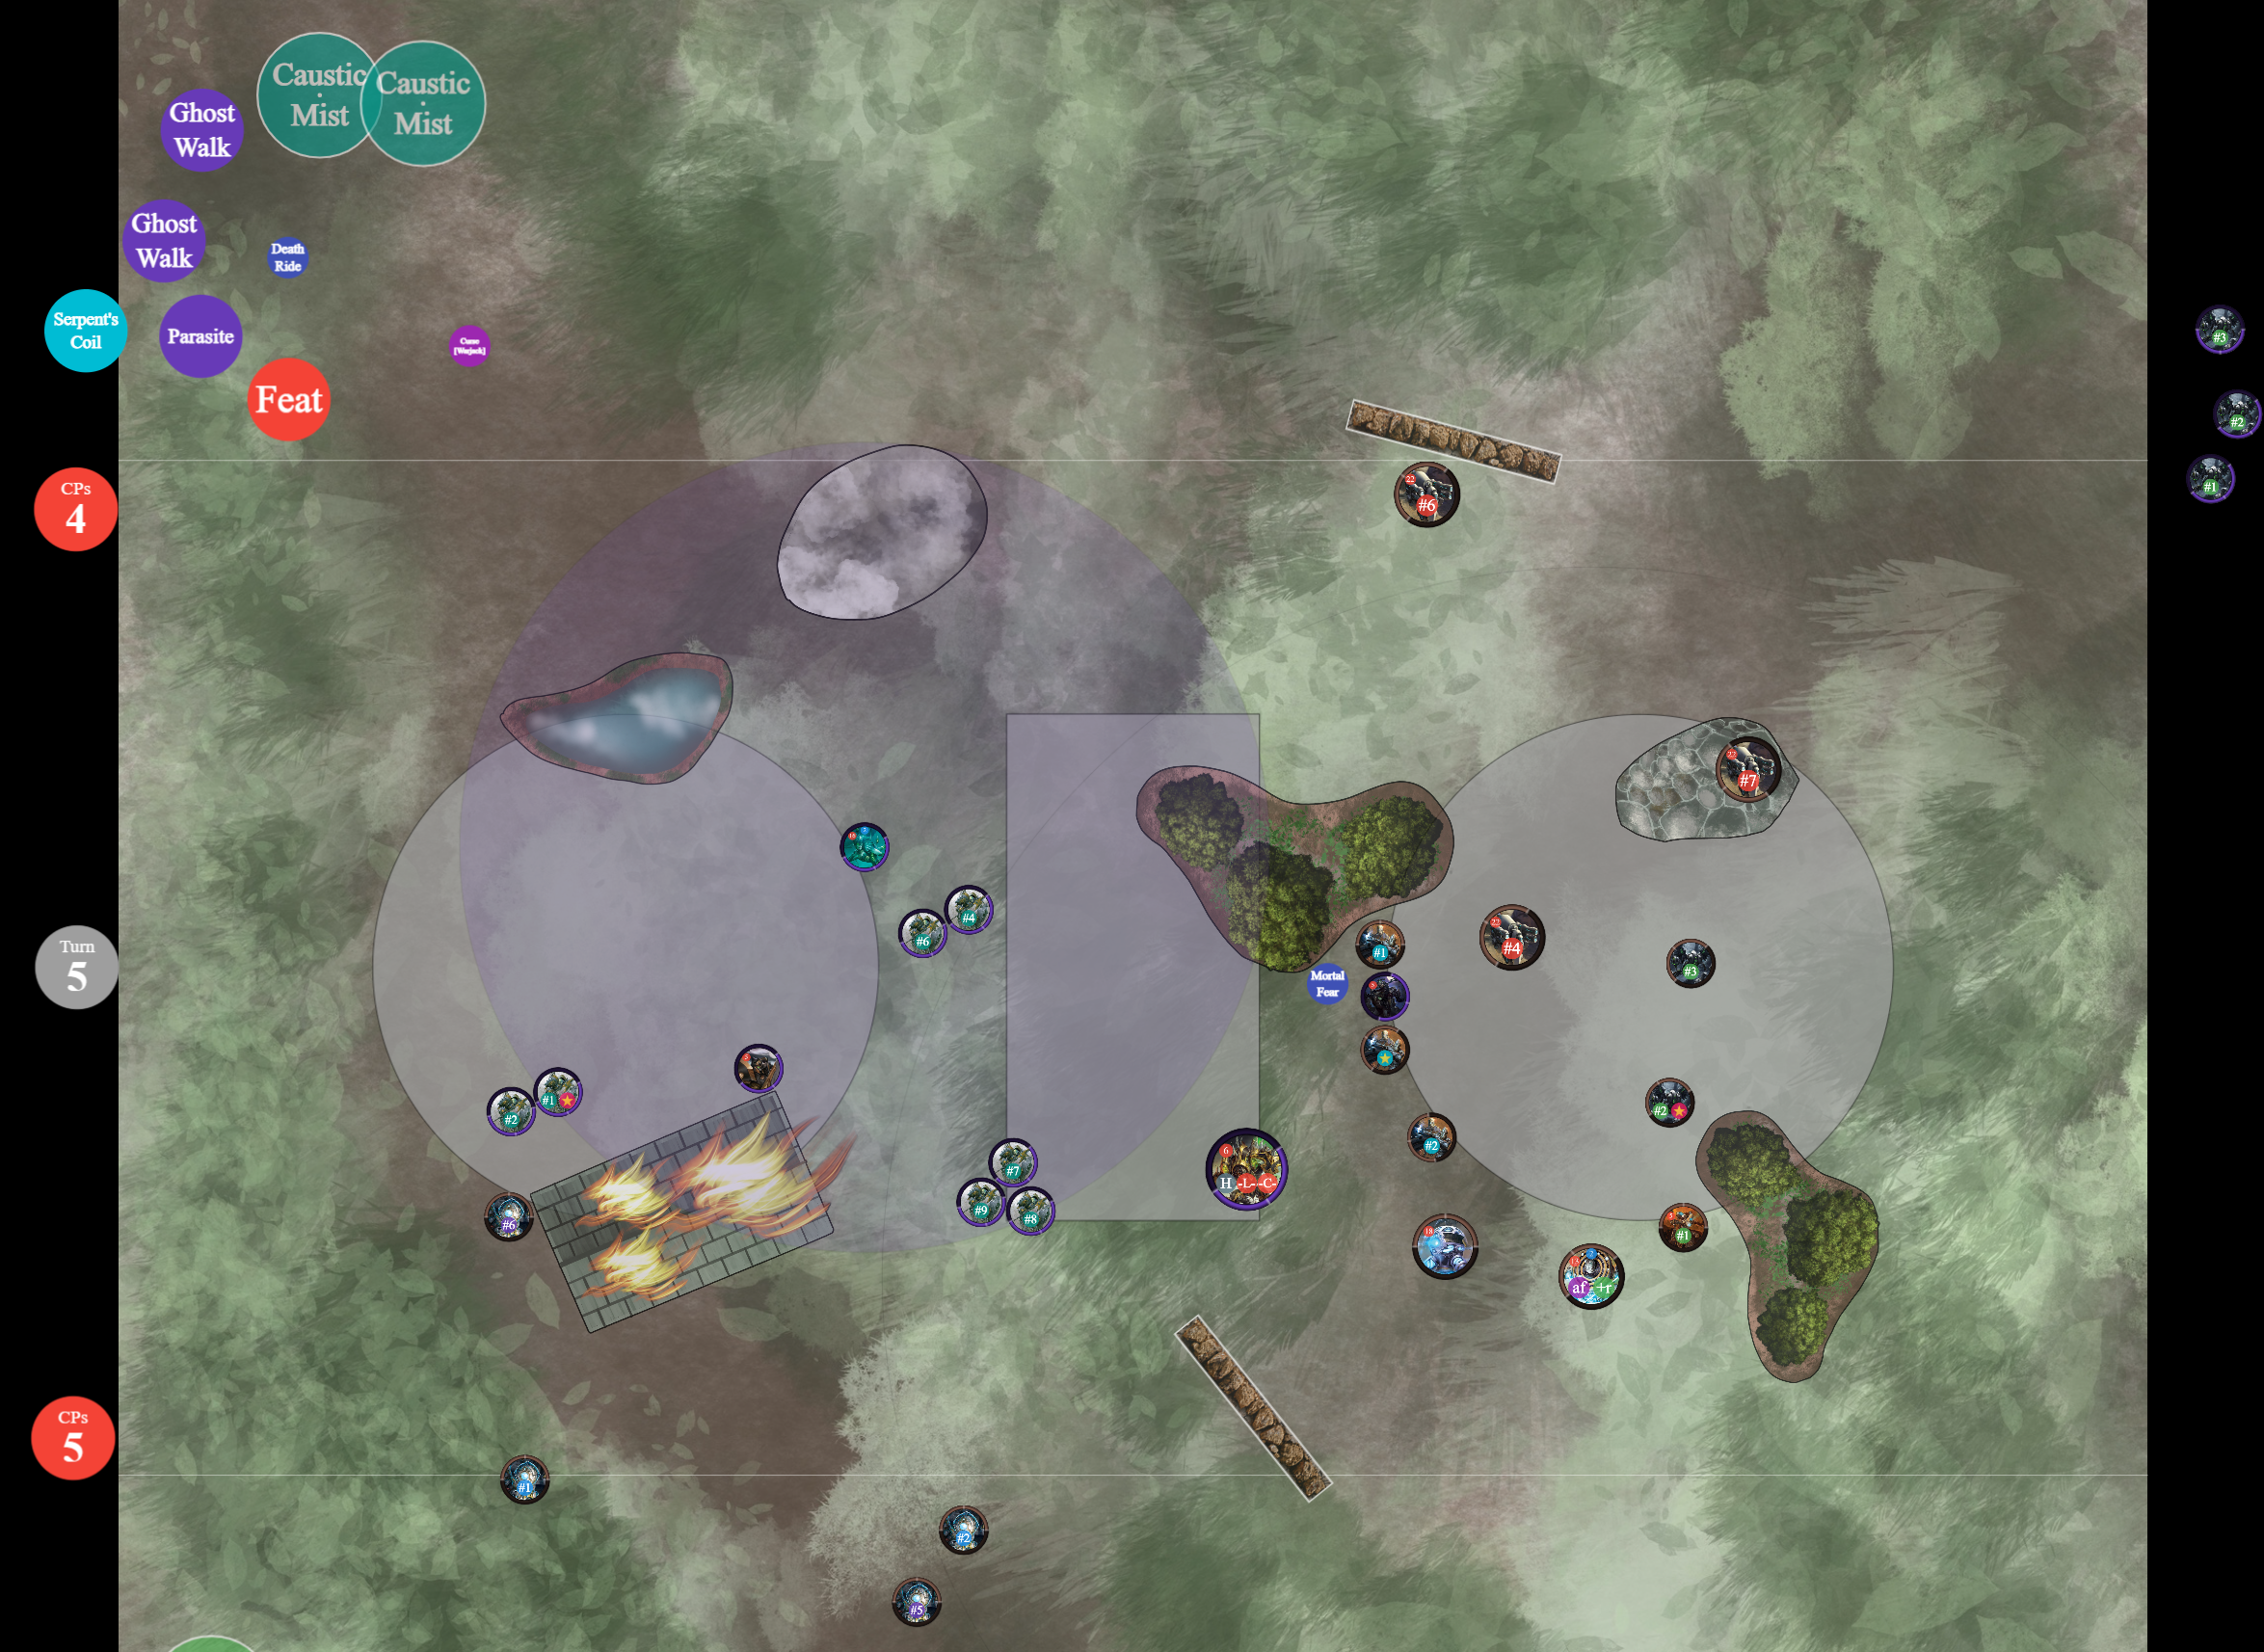
At the very end, at the top of turn 7, my opponent was 1 point ahead, needed to contest the left zone and score his own from a single Bane Knight to get ahead by 2. Since he was also ahead in points destroyed this would’ve given him the win. Unfortunately for him, he spent a bit too much time running things to the left, which caused him to clock while attempting to take care of the 1 Bane Knight up in his face.
Even if he had only contested and not scored his own zone, I would’ve needed to score 2 myself to be able to win. That would’ve meant that I need to relocate Agathia to the middle zone, while pulling the Knights back to the left and also clearing that zone of 3 models. I didn’t actually have anything else left to contest the other zone with then, so I’m quite sure that that was impossible. I was lucky that my opponent didn’t have enough time to properly think that through, I think he started his turn on 30 seconds, or I would’ve simply lost at the end of round 7.
Summary
I must say that I felt rather lucky to be given an out that I probably didn’t deserve in both of those games, but on the other hand, I was impressed with the amount of punishment that this version of Agathia can take while still being more than able to dish out plenty of it herself. Even if those opportunities hadn’t presented themselves, I felt confident that I had a fighting chance in both of these games, which is not something I had felt before playing them.
As is common with these types of events, my opponents were great and I very much hope to meet them again in the future.
This article has gone on for long enough now, so I will keep the next 2 rounds for another installment.

You do some great write ups. Have you ever thought about doing the write ups as you do now. And then take the pictures as media and write up as a script and produce videos for upload on YT, Rumble, and Odysee?
LikeLike
Thanks for the kind words. I actually haven’t thought of that. It may be something I choose to do in the future, but for the moment I don’t think I will. I enjoy writing, from time to time, but it does eat up a lot of time when I want to get it right, and if I were to record a video based on the “script”, it would only add to that.
Also, as a personal preference, I like having things like this in writing, because it’s often faster to read than to watch a video, and you can do it basically any time you have 5-10 minutes, and can more easily look for information. I’m personally not a huge fan of battle report videos, because they take a while to watch and it’s much less convenient to search for something particular. Ctrl+F is a very dear friend of mine.
Though, it is something to consider, thank you.
LikeLike