Introduction
Now that the WTC is over, I want to focus a bit more on other casters again and the first one that caught my eye is Deneghra the Soul Weaver. Mortality is still great in the current meta and even though I feel the Revenants were overnerfed during the Black Fleet CID, I think she would theoretically do great in Ghost Fleet.
One of the lists at the WTC caught my eye and I wanted to try it. The only modification I made is to include a Misery Cage instead of 1 of the Machine Wraiths; extra focus never hurts and the corpses regenerate anyway.
https://conflictchamber.com/?c4201b_-1VeZkA1919jA2DhCoR2k2kkqnK203g203g203gbB
Cryx
[Theme] The Ghost Fleet
[Deneghra 3] Deneghra, the Soul Weaver [+27]
– Barathrum [15]
– Deathripper [6]
– Deathripper [6]
Agrimony, Crone of the Dying Strands [4]
Captain Rengrave [5]
Hellslinger Phantom [0(7)]
Hermit of Henge Hold [5]
Machine Wraith [2]
Machine Wraith [2]
Misery Cage [2]
Press Gangers (min) [7]
Revenant Crew of the Atramentous (min) [9]
– Revenant Crew Rifleman (3) [0(6)]
Revenant Crew of the Atramentous (min) [9]
– Revenant Crew Rifleman (3) [0(6)]
Revenant Crew of the Atramentous (min) [9]
– Revenant Crew Rifleman (3) [6]
Wraith Engine [15]
vs Cryx
I wanted to try this against a theoretical bad matchup. I know from back in the days that Asphyxious 3 was a surprisingly good Ghost Fleet drop, especially with Deathjack in there, because you can use Hellfire to snipe out the leader models, which means that Deathbound shuts off.
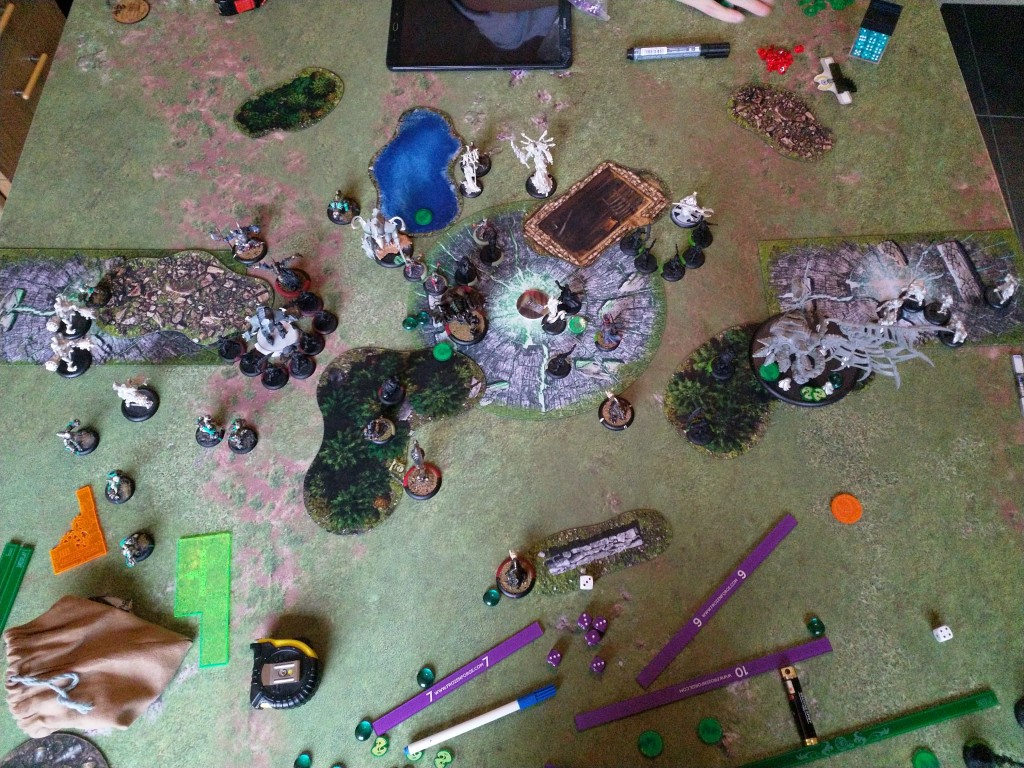
Deneghra 3 GF vs Asphyxious 3 BI
King of the Hill
There’s a lot of Hellfire here and it’s backed up by some good support and durable jacks. Durability is something the current iteration of Ghost Fleet doesn’t really want to face, so we’ll see how this goes. Luckily, it’s on my favorite scenario.
I won the rolloff and decided to go second, even though I know that Gaspy could jam me out of the scenario, but I needed to have access to the side with 2 large forests if I was going to have any chance at keeping my Leaders safe.
My opponent is very cautious after running up full throttle on turn 1. I move up as much as possible while keeping my leader models safe.
His turn 2 he only charges a single Slayer onto Barathrum after using the Hellslinger Phantom to clear some blocking models. I get lucky and while the (boosted) Combo-strike connects and does a lot of damage, it struck column 3 and I lose no systems. The follow up attack fails to hit. Other models take care not to get charged too much, being unconvinced that the Revenants are as pillow fisted as they appear.
Because of his caution, there’s a single Slayer in the zone with his objective and only the Hellslinger, hiding behind the house, that is in the central zone.
I was able to leverage the Hermit to apply Whispers at the Gate/Master of Ruin to the aggressive Slayers as well as one other that was just outside the circular zone. The offending Slayer is currently next to a Revenant so I’m able to charge it with Rengrave, which allows Barathrum to finish it off. Deneghra uses an arc node to Mortality the other Slayer and then reposition into the right rectangular zone. 5 Revanants charge into the Slayer at -2/-4 and leave it on a couple of boxes. Pillow fistedness confirmed…
The 3 Riflemen in the left unit succeed at rolling a hard 7 to snipe the Hellslinger Phantom from behind the building, he had shot some models the previous turn, so I didn’t need Sigil of Power. This allowed the middle unit to run into the zone while Agrimony can run to the flag.
Since I feel like getting a big lead on scenario is important, I let my Wraith Engine charge the opposing objective for the point. It will be impossible to kill the Slayer contesting, so the score ends up at 4-0 after my turn. I also put a Machine Wraith in each of the rectangular zones to have an extra contester.
My opponent ambushes his Mechanithralls and demolishes the Wraith Engine, but they then can’t deal with the contesting Machine Wraith. Darragh makes sure my contesting Machine Wraith on the other side, as well as the single member of the Revenant Crew, bites the dust, enabling Cankerworm to break the objective and score the zone, seeing as Deneghra can’t contest by herself.
Deathjack snipes the middle unit leader so that unit loses their recursion and the zone is contested. The crippled Slayer kills some Revenants surrounding it. Agrimony survives and the score goes to 4-1.
The Hermit is not worth putting attacks into for such a low model count army, so he can do his thing again and debuff the already crippled Slayer and Deathjack.
My Pressgangers Ambush on the right to help out Deneghra to clear the zone. Deneghra then feats, puts Mortality on Deathjack, Cankerworm and Darragh and charges the latter. She manages to take him out with the aid of the Misery Cage, because she had ended B2B so she can still attack the dismount, but it took quite some effort. Why does her dragon hit like a sparrow…?
The Pressgangers gang up (get it?) on Cankerworm and destroy it, though barely.
The surviving Revenants, with the aid of a fully loaded Barathrum can take out a debuffed Deathjack to clear the middle zone and I end my turn by scoring 7-1.
I got lucky that my opponent felt uncertain about his ability to tank my list,even though he could, which meant that I could exploit the scenario. Judging by the abysmal performance in turn 2, I don’t think I would’ve been able to break through the ARM and box spam otherwise.
vs Grymkin
The next game I tried the list into was the exact same one that trounced me at the WTC in round 5. Unlike in the past, when there were no Clockatrices and all heavies had auto-RFP, Ghost Fleet might actually do well here, especially backed up by Mortality, so let’s see.
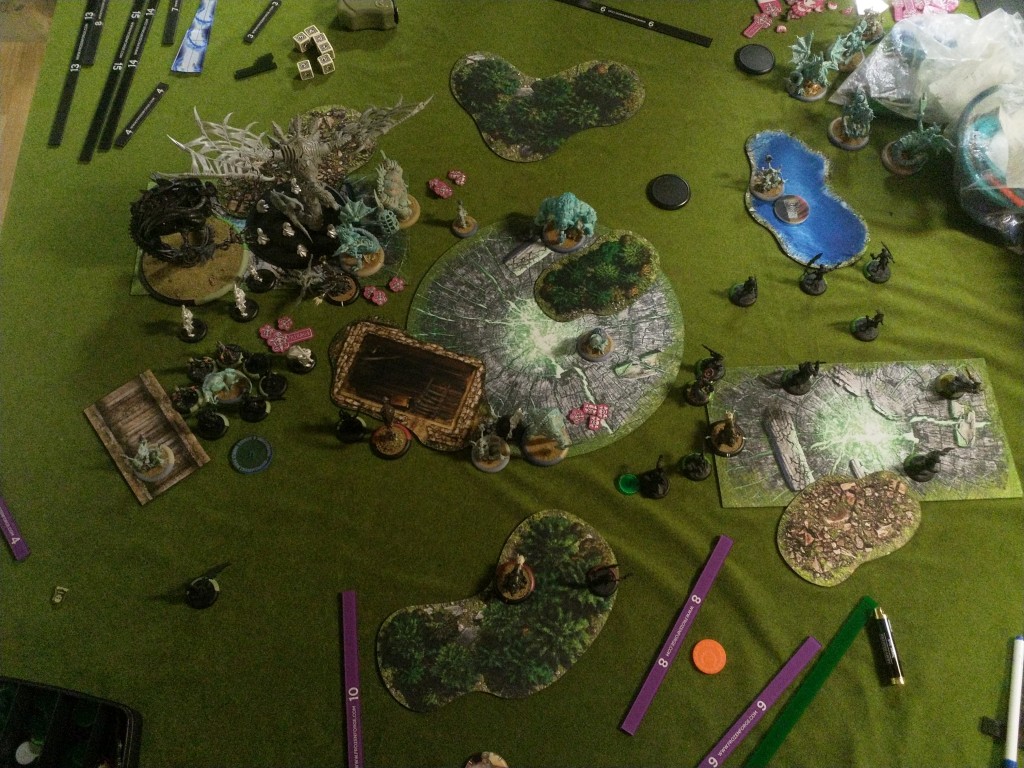
Deneghra 3 GF vs The Child DM
Spread the Net
My opponent wins the roll and elects to go first. I chose the side where a house in the middle can protect my Misery Cage, that can contest the flag, and can keep Deneghra somewhat safe from charges.
My opponent moves forward aggressively, trying to leverage his long threat ranges.
I put Deneghra behind the building so that she will basically always get the +2 DEF against melee. She puts Ghost Walk on the 2 units of Revenants that need it and Barathrum gets Grave Wind. I pull 1 from the Misery Cage so she can camp 2.
Barathrum is relatively aggressive in the middle of some Revenants, the Wraith Engine is somewhat behind my flag, just within 13 of 1 of the Clockatrices.
My opponent takes the bait and puts Enrage and Abuse on the Clock that will charge the Wrath Engine. The ones that will go for Denny and Barathrum both get Abuse. He’s able to put the one charging Barathrum in such a way that he won’t get pushed if he misses and uses his 2 remaining Clockatrices to clear some landing zones while leaving the other 2 heavies and Gorehound as the second wave. Note that all of the charging Clockatrices do so for free because of Pain Respsonse.
At effective DEF 17 and 2 camp, Denny is completely safe, while the Wraith Engine survives on 11 boxes due to the Clockatrices missing 2 (unboosted) sixes and not being able to leverage 2 of its initials due to being out of range.
On the other side, Barathrum does not fare so well. The unboosted Assault shot hits and spikes for 3 damage, then he boosts the tail charge attack, hits, but bounces off Mad Visions. His other 2 initials hit the unboosted 9’s, which spike again and succeed at taking out movement, putting Barathrum down to DEF 7. Then of course the 2 followup attacks also connect and spike some more, leaving Barathrum at 1 box of cortex. That was quite unexpected for a 15/18 heavy, with Mad Visions available, getting charged by a MAT 6 P+S 16/15 one…
The chicken that charged Deneghra didn’t do any damage, but it did have Discord on it, so my caster is now unable to cast any spells, and I kind of need those. So I charge off to the very left Clockatrice, one that just sprayed a couple of Revenants to clear the way for another chicken. The resulting free strike misses. I feat, cast Mortality on my charge target, as well as the Clockatrice engaging the Wraith Engine, that I’m now also engaging. I also manage to put Mortality on the one that was formerly engaging Deneghra, through an arc node to avoid cover. I cycle Grave Wind to Deneghra as it seems more useful there than on poor Barathrum. She roughs up both Mortalitied Clockatrices a bit until they jump away.
The Hermit does nothing this turn as he can’t get anywhere useful that is not inside Wailing.
I ambushed on the left to let the Pressgangers help kill a Clockatrice and contest the zone.
Now the turn consists of a bunch of Time Stutters, so forgive me that I can’t get the order things happened in right. The end result is that the left Clockatrice is dead, the one that formerly charged the Wraith Engine is alive on 1 aspect, within 4″ of my flag. This allowed the Wraith Engine to charge the middle Clocaktrice, the one with Discord, which eventually dies. There’s a bunch of damage on the Skin & Moans and the chicken that had charged Barathrum died to a combination of Rengrave, Barathrums boosted tusks dealing 6 damage and the remaining Revenant Crew. This is good, because that’s the one I didn’t land a Mortality on.
I ran up a Machine Wraith to contest his flag, but am only able to score my own rectangular zone. Not as good as I had hoped.
My opponent is lamenting how this game is going because he has lost almost 4 heavies and barely has anything to show for it, but at this point I’m not so sure it’s really as bad as he thinks it is. Because he was able to pop the Wrath Arcana on my turn, he was able to leach sufficiently so there were no frenzies.
He moves the Clockatrice, affected by Mortality and with only Spirit left, back into his zone, puts Discord on the Gorehound through the Cage Rager. The Child then moves to the edge of the zone to Force Hammer the contesting Machine Wraith so the Gremlins can score the flag again. The Skin & Moans gets a heal so it’s fully functional again.
The Gorehound clears the 2 Pressgangers from the zone and then sprints into the middle of the Revenants, within 5″ of Deneghra. A Gremlin Swarm runs base-to-base with the “dragon” as it’s a battle engine and will get affected.
The S&M then tramples through 5 Revenant Crew, healing from all of them and buying 2 more attacks at the end targeting my Leader model and another Grunt. Out of 7 possible attacks, he missed only 1 6 and is now healed almost to full and on 3 corpses. The Cage Rager tramples towards 1 more grunt and kills it, while the Baron then jumps towards the last of the Revenant Crew in the zone and hits the unboosted 8. Barathrum dies to the last Clockatrice and my opponent scores 3 from the rectangular zone, the middle zone and his flag while contesting my scenario elements.
So, I lost my middle, there’s still a Clockatrice on 6 boxes staring me down and my army has Wailing smack in the middle of it again.
Deneghra decides to charge the crippled Clockatrice, which would put her outside of Wailing, however, the Gremlins rolled -2 to attack rolls, which severely limits what she can do, especially Mortality-wise. There was really no way I could clear those Gremlins first because I needed Agrimony to clear the Gremlin Swarm that was B2B with the Wraith Engine, of course she rolled only 4 damage for her Bone Shaker, so that didn’t exactly pan out either.
Back to Deneghra who is heroically charging a limp chicken and who hits her charge attack, dealing a whopping 3 damage. I knew my opponent still had the Ruin Arcana in his back pocket, so decide to lure it out by casting Scourge at the Clockatrice, which would knock it down and make it easy pickings, so I lose Grave Wind in the trade. No biggy, I will buy an attack and boost to hit, but miss. Still no problem as I have 3 focus and a Misery Cage left, so can try again, but the second boosted attack also misses. I then decide to use my last 2 focus to instead put Ghost Walk on the pirates so they can circle the Gorehound and take it out, so one of the Pressgangers can charge in and finish the Clockatrice. I let Deneghra reposition to exactly 2″ of the Clockatrice, which was actually a mistake, as the crippled mind and body would make it so the free strike could never hurt me.
Anyway, the Revenants get a Press Forward order, which the front 5 don’t hear and so they’re free to circle the dog. I get 3 walking into the back arc, 2 more in the front and 2 charges in the front. When the dust settles, the Gorehound has taken a massive… 3 damage.
I must admit I’m quite tilted now and get desperate as now the Clockatrice will be able to heal and easily kill Deneghra on 0 camp. I charge in the Machine Wraith as the Gorehound prevents me from scoring my flag anyway. It miraculously hits! Then I roll a 7 on the charge damage and still leave it on 2 boxes.
The Wraith Engine can’t really do anything useful so just runs to the far zone. Rengrave and the Deathripper actually succeed at taking out the Clockatrice in my zone, with some help from the Hermit. The Riflemen of the now freed unit take some pot shots at the Clockatrice, but fail to hit because you can’t combine into melee. I do contest the flag and score the bottom zone, so the score goes to 2-3.
It’s pretty much over now; the Clockatrice heals itself to fully functional and gets Enrage. The Cage Rager gets Abuse. The Clockatrice by itself spikes a lot and leaves Deneghra on 3 boxes, so it’s easy pickings for a trampling Cage Rager.
And that kids, is why you should never assume it’s over until the fat lady sings. I definitely made some mistakes near the end. I probably should’ve gone for Mortality over Scourge as I knew it would get countered and it’s cheaper. Then I could’ve cast it again and the Clockatrice would’ve still been unable to heal, even if I couldn’t kill it.
I should’ve walked Deneghra further back so the Riflemen could CRA, increasing the odds of finishing off the warbeast.
After things kept going wrong, I should’ve given up on using the Wraith Engine to rough up the other heavies and immediately ran it to the Clockatrice, which would’ve meant that the Machine Wraith would take it out and the way for the Cage Rager would be blocked.
Instead I let dice put me on tilt, which lost me the game, like a rookie, so I’m not exactly proud of that.
Other things to learn from this is that, while the Revenants are still pillow fisted, the list has just enough heavy hitters to threaten a few things and the current popular Grymkin build is a lot worse at countering Ghost Fleet. Mortality is also great against “clock spam”. The Revenant Crew itself is still barely sufficient to just run in the way though.
Summary
All in all, I do like this list, especially in the current meta. It should be good against Tharn as well and be able to deal with Immortals. It can’t really deal with high ARM, but if there is little in the way of RFP, it can jam for days.
My main problem with Deneghra 3 however, is still that her dragon is not worthy of the name and I would really like it to be a bit more beefy.
Honestly I’d be happy with +1 ARM, POW 14 mount attack and a spray that is not a severely toned down Venom (RAT 4 and only 1 shot). I’m thinking Terminus’s spray would be perfect for an actual dragon, and Assault would make it feel less like a gimmick.
