Introduction
I participated in the recent CID that had Asphyxious 4 and tested him twice. For those that missed them, or don’t participate in CID, I figured I might as well put the reports up on this blog as well.
I won’t be including every single picture, as they are not all truly relevant.
Deneghra 2 (week 1)
Intro
I played a game against my friend playing Skorne. After I begged him not to play Exalted, as it would defeat the entire purpose of my list, we ended up with the following matchup.
I mainly wanted to test the impact of caster-independent threat and damage buffs on Deneghra 2’s game plan.
Models being tested are in bold, proxies in italics between parentheses. Strictly speaking, Asphyxious’s jacks are not under testing, but their inclusion in Cryx is.
Cryx
[Theme] Black Industries
[Deneghra 2] Wraith Witch Deneghra [+28]
– Deathjack [23]
– Deathripper [6]
– Slayer [10]
– Slayer [10]
– Slayer [10]
Hellslinger Phantom [0(7)]
Necrotech [0(2)]
Necrotech [0(2)]
Necrotech [0(2)]
Asphyxious the Sanctified [14] (Terminus)
– Annihilation Servitors (Carrion Thralls)
– Diffuser [6] (Defiler)
– Swabber [13] (Malice)
Mechanithralls (min) [6]
– Brute Thrall (3) [0(6)]
VS
Skorne
[Theme] Masters of War
[Makeda 3] Makeda & the Exalted Court [+25]
– Agonizer [6]
– Cyclops Brute [8]
– Molik Karn [19]
– Aptimus Marketh [5]
Extoller Novitiate [2]
Extoller Soulward [3]
Hakaar the Destroyer [0(6)]
Swamp Gobber Chef [1]
Cataphract Cetrati (max) [18]
– Tyrant Vorkesh [0(6)]
Paingiver Beast Handlers (min) [5]
Praetorian Swordsmen (max) [13]
– Praetorian Swordsman Officer & Standard [4]
Tyrant Commander & Standard Bearer [0(6)]
Supreme Guardian [16]
Setup
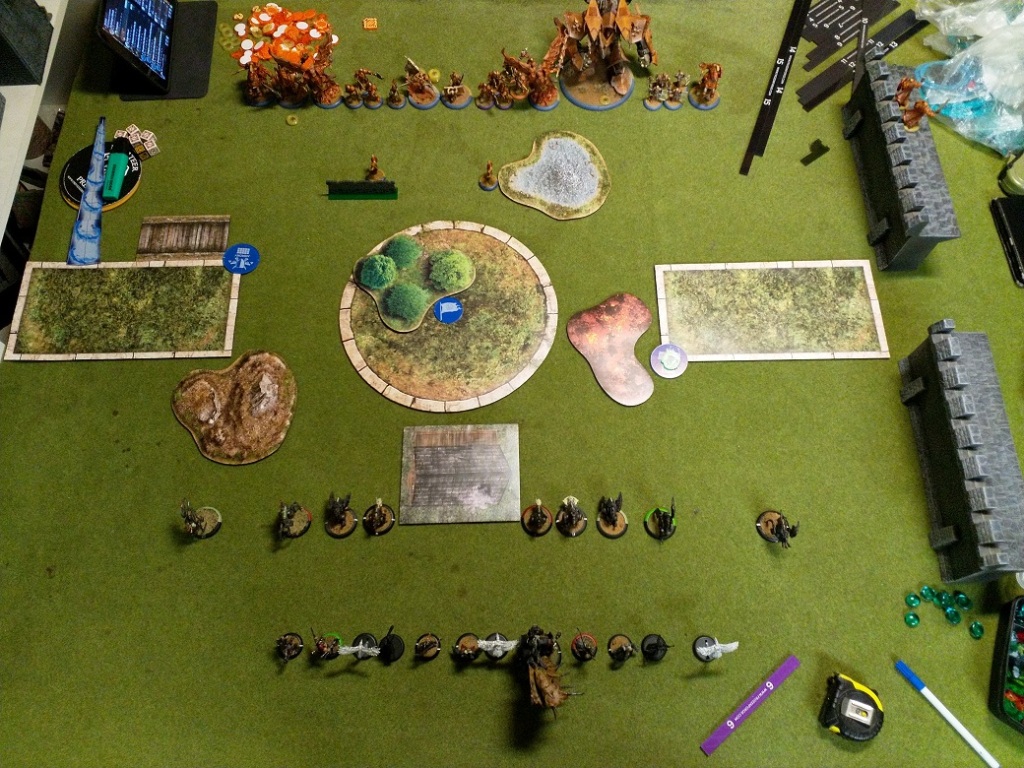
I win the rolloff and elect to go first to pressure the board. Deployment is as follows, note that the terrain in the middle was played as being an obstruction.
My Mechanithralls are in Ambush. I chose Treasure Chest and my opponent elected to get Eyeless Sight from his objective, to have multiple ways of circumventing my clouds.

Turn 1
Cryx
I run everything as far as possible, after allocating 1 to the Diffuser, since it doesn’t Power Up. Deathjack stays outside (melee) threat range of everything, but is otherwise fairly aggressive up the board.
Skorne
Makeda is already feeling the heat. She puts up Bulwark and some mooks are killed to start fueling the Supreme Guardian. The Cetrati are already rather worried, so receive +2 SPD and just move up in Shield Wall, there’s still time before I start scoring anyway.
Turn 2
Cryx
Alternate reality:
An assassination actually already presents itself. The Diffuser gets Puppet Master and Deneghra gets the Treasure Chest buff. The Diffuser manages to shoot the Brute (I had forgotten it was DEF 15, but still), but it gets Shield Guarded to the nearest Court member. Deneghra went Incorporeal and feated on her jacks. She then Shadow Steps to get line of sight to it, charges, and after the first hit, buys on Makeda, hits and ports her only 4” away, still in range of the Agonizer. Makeda gets shot in the back by the Hellslinger, Asphyxious runs towards Makeda, because the Servitors were too far anyway and Deathjack charges in. She dies to the helljack’s onslaught, but, because of Blood Thirst, I would’ve had 1 more Slayer that could get to her, through the building.
“Real world”:
We rewind by saying the Beacon shot got daisy chained to the unit member in the back, where I can’t draw line of sight to and play in earnest.
Deathjack gets 2 extra focus, the Diffuser gets nothing as it won’t be doing much. Deathjack then gets Puppet Master from Eilish and Hellmouths 5 Swordsmen. The rest of my models just get into better positions, with Asphyxious’s unit being as spread out as possible. Note that they didn’t run as I wanted to put down some Caustic Mists. Deneghra herself simply camps her focus.
Skorne
Makeda basically just bunkers up, as she is wont to do, while the rest of her army jams me while contesting the zones. Not much special happened.
Turn 3
Cryx
I only need to kill 2 Cetrati and a handful of Swordsmen, that can all be pulled in by a well place Hellmouth, to clear the zones. My Mechanithralls Ambush on the left so I have something to score. The Slayer on the bottom of the left zone gets allocated 2 and gets Puppet Master. Deathjack is out of control range, so only gets his 2 focus from Skulls of Hate.
The loaded Slayer charges into the first Cataphract, using Combo-Strike. It connects and at straight dice for damage (Shield Wall + Gnawing Pain), the Cetrati dies, but rolls Tough. A bought attack makes him bite the dust. Another bought attack on the other Cetrati, who is no longer B2B with another member of the unit, leaves it on three boxes. The second Slayer walks over, deals 2 damage and then kills it.
The Mechanithralls swarm the zone, while the Hellslinger goes wide to hopefully end up taking out some support in later turns.
The Necrotech on the left stabs the left Servitor in the back, because it would never make it to the zone on the far right.
The Deathripper runs so Deneghra can arc Hellmouth on those pesky Swordsmen. She hits, but one of them survives. Deathjack was also drawn in and would like to Venom, but he can’t as he can’t walk sufficiently far to stay out of range of Molik and the Supreme Guardian, while also being in control range of Deneghra.
Asphyxious and his 2 Servitors walk into the zone, also outside 11 of Molik. And this is where I make a mistake; I then walk the Swabber B2B with Asphyxious, as I want to use his Interface-like ability, to make sure I can boost both shots to kill the Swordsman, which I do and score 2-0.
I probably should’ve feated this turn, but during Deneghra’s activation, it didn’t feel necessary.
Skorne
So, of course the mistake was that I now gave Molik Karn a charge, and thus a Side Step, target. The Brute moves out of the way, so Makeda can walk up and feat, after casting Fate Walker to get in the perfect position of B2B with the Brute, while catching all my important models in Incite range.
Molik receives Enrage and the free charge, charges the Swabber, Side Steps in range of both Asphyxious and Deathjack, kills the former with his second initial and 2 bought attacks, through my 3 camped focus, MAT 9 P+S 18 Weapon Master will do that, then, after removing a Fury from the feat, leaves Deathjack hanging on 2 boxes, with only the right arm intact. That “little” mistake just cost me approximately 56 points, counting Deathjack and Asphyxious’s battle group.
The Cetrati, with some help from the Titan Commander take out 1 of the Slayers, and Makeda, who is camping 3, removes another Fury from her favourite Cyclops to get another transfer target. The Agonizer puts up Gnawing Pain again and the Supreme Guardian moves B2B with the Brute to bunker Makeda, which was actually a mistake.
Turn 4
Cryx
With my army in shambles, there’s only 1 thing I can do, but it’s what Denny does best: go for the throat. I use Wraith Walker and allocate full focus to the middle, intact, Slayer, who also receives the Treasure Chest bonus. Deneghra receives Puppet Master and feats on everything that’s important.
I charge the Supreme Guardian through the house, in the back of it and Makeda. I hit it and port it 9” away. I cast Shadow Step to lower defences, now that the Arcane Vortex is far away, I buy and boost an attack at Makeda, hitting, but again roll a 1 for Dark Banishment, which means Deathjack won’t be able to walk close enough. I do manage to plink a couple of damage. I buy a last attack at the Agonizer, dealing negligible damage, even after Puppet Master, but also teleport it away.
The Slayer leaves Makeda on 4 boxes, after she transfers the Brute to 1 hp. My Deathripper walks up, misses its first attack, but spikes on the bought attack and puts her down. I had a Necrotech left as backup.

Test feedback
Asphyxious the Sanctified
With all the Shield Guards, as well as Arcane Vortex and Sacred Ward on the Cetrati, a lot of my threat range shenanigans wouldn’t work. Having at least Bloodthirst, to threaten the important models, kept my opponent somewhat honest and was a great boon.
He’s a unit and you want the Servitors to run while he just walks and casts spells. But you can’t do that according to this ruling: https://privateerpressforums.com/showthread.php?277805-Warcaster-units-Press-Forward-and-casting-spells&p=3875153&viewfull=1#post3875153
This is rather clunky and makes him difficult to get the most out of. I didn’t want to commit him because I would lose his battle group, but that meant that the Servitors also did very little. This is likely a fine balancing element though.
The clouds felt useful, without being overpowering, while Flicker was most useful just for the threat of it, even though, like I said, I didn’t want to commit him that early anyway.
I kind of want to say that he’s still a bit (too) beefy, but I can’t really speak to that as Molik went through him like a hot knife through butter. In theory, I wouldn’t mind if he reverted to his original Iron Lich stats of base P+S 15 and 15/16 DEF/ARM with 18 boxes. I would prefer to keep SPD 6 and MAT 7 though, as he’s still supposed to be a threatening model.
The Servitors did nothing, but I kind of liked having a (low) P+S option before. That way it was possible to high roll and kill a solo, whereas now they don’t do much besides projecting Dark Shroud and killing single wound infantry.
Sadly, I consider the soul collection largely irrelevant for 2 reasons. 1 being that they are tethered to Asphyxious, and second because I’ve been playing Cryx for a long, long time and I never count on getting souls, much less so with all the construct armies and/or Soul Ward that are currently popular.
The Diffuser barely did anything, because I didn’t feel it worth feeding focus because of the Shield Guards. However, I really feel like the extra threat extension options up Deneghra’s game a lot.
The Swabber also did little, but he’s a great jack to have access too. It doesn’t hit particularly hard, but has great stats, good utility, and 2 ranged attacks, which in a way allows it to outclass both the Reaper and Inflictor at the same time.
Skarre 1 (week 2)
Intro
I played the following against Harbinger. I wanted to try and break the work Asphyxious 4 could do coupled with a ludicrous amount of Stalkers and Skarre 1. Playing it against one of the current meta boogeymen ensured getting some valid data.
The lists, models under test are in bold, proxies between parentheses:
Cryx
[Theme] Scourge of the Broken Coast
[Skarre 1] Pirate Queen Skarre [+28]
– Stalker [8]
– Stalker [8]
– Stalker [8]
– Stalker [8]
Aiakos, Scourge of the Meredius [0(4)]
– Stalker [8] (Deathripper)
– Stalker [8] (Deathripper)
Hermit of Henge Hold [5] (Eilish)
Satyxis Raider Captain [0(4)]
Satyxis Raider Captain [0(4)]
Warwitch Initiate Deneghra [4]
– Stalker [8] (Ripjaw)
Warwitch Siren [4]
Warwitch Siren [4]
Asphyxious the Sanctified [14] (Terminus)
– Annihilation Servitors (Carrion Thralls)
– Stalker [8] (Helldiver)
– Stalker [8] (Helldiver)
VS
Protectorate
[Theme] The Faithful Masses
[Harbinger 1] The Harbinger of Menoth [+27]
– Judicator [35]
– Hierophant [3]
Avatar of Menoth [18]
Allegiant of the Order of the Fist [3]
Allegiant of the Order of the Fist [3]
Champion of the Order of the Wall [8]
Champion of the Order of the Wall [8]
Menite Archon [8]
Menite Archon [8]
The Covenant of Menoth [4]
Choir of Menoth (min) [4]
Initiates of the Wall [0(7)]
Initiates of the Wall [0(7)]
Initiates of the Wall [0(7)]
Setup
I win the rolloff and elect to go first, setup is as follows.
Turn 1
Cryx
Deneghra’s Stalker receives Witch Bond and I run forward as far as possible, staying outside of 13” of everything and outside 15 of the Judicator, for the sprays. I deliberately put a Stalker each within 15” of a Champion in the hope of baiting my opponent into casting Crusader’s Call. In hindsight, this may have been a mistake, even though it worked.
Skarre cast Ritual Sacrifice on a Servitor and I rolled a 2.
The models not benefiting from Stealth stay outside 19” of the colossal as to not get carpet bombed.
Protectorate
So, my opponent goes in and I lose the Stalker on the right. The one on the left is left on 2 boxes, with just an arm intact.
My opponent is very conservative with his Judicator, because he’s in fear of losing it to Stalkers. He gets 1 lucky deviation with the rocket pods after receiving Hymn of Battle and nearly destroys 2 of the Stalkers. One of the Allegiants takes one of them out of the picture. The rest of his army bunkers around Harbinger so I can’t get to her.
Asphyxious also took 1 damage from another deviation.
Turn 2
Cryx
I’m already down 2 Stalkers and 2 more are not looking too hot. This is definitely less than ideal, but I still want to feat, before I lose my whole army. Skarre activates, casts Dark Guidance and feats on 11 models: herself, Asphyxious, Aiakos, 7 Stalkers and a Raider Captain. Most of the Stalkers are fully allocated.
The Raider Captain and the one-armed Stalker kill the Champion on my left, while the other gets destroyed by the remaining Stalker on that side, with some help of a Servitor who was just standing nearby. I didn’t charge with it, as I didn’t want it to die to Retaliatory Strike. Asphyxious charged the Allegiant of the Fist, which of course gets saved by Martyrdom, after which the nearby, crippled, Stalker finishes the job, yielding a soul.
The remaining Stalkers get around Gaze of Menoth by jumping a bit and between them take out one of the Menite Archons (I did this first, before it got mad) and reduce each unit of Initiates to 1 member. Dark Shroud helped here a little. Deneghra didn’t get her soul because of Soul Ward.
I set up for scoring the flag and possibly the zones if my opponent were to retreat.
Protectorate
My opponent’s Judicator takes care of the 2 Stalkers wiggling their butts at him while the Choir is taking one for the team by going to contest the zone. The Avatar takes care of the already mangled Stalker and the Raider Captain, even with the Hermit’s Mad Visions, while the rest of the army shuffles around to try and take care of the Stalkers breathing down their necks. End result is that Skarre has 2 Stalkers left (1 on the right and 1 near the Archon) and Aiakos has the one that was already damaged by the earlier deviation. Asphyxious and his Servitors get Rebuked for their trouble.
My opponent did make the mistake of moving his Covenant a bit too far back, allowing me to score the flag.

Turn 3
Cryx
There’s not that much left to do, so I decide to test Asphyxious’s output after he converts his 1 soul to focus. He can’t charge, but I can activate the Warwitch Initiate to walk and cast Curse of Shadows at the Judicator. Skarre activates to cast Dark Guidance so the Stalker in the back can take care of the monk, as I know that I will never have the output to take out the remaining Archon, but luck favours Menoth and the Allegiant is left on 1 hp.
Asphyxious Flickers forward and lands a total of 5 attacks onto the colossal, taking out slightly more than half his grid.
Aiakos and the remaining Stalker team up on the Covenant so I can finally score the zone and the Choir dies to the combined efforts of the last mint Stalker, aided by the Siren’s Venom. The Hermit runs into the left zone, so I can bring the score to 4-0.
Protectorate
Harbinger attempts to take care of Asphyxious by herself, but it seems the Creator did not favour her today. She walks and buys 3 attacks, boosting damage, but rolls atrociously and leaves him on 5 boxes, even while hitting automatically. The Judicator was supposed to run into the zone, but now has to turn around and boost a single attack, with his good side, into the Sanctified lich to finish him off. My army is annihilated as shown in the picture; only Aiakos, the Servitors, both Sirens, Deneghra, a Captain, Skarre and a single Stalker remain alive.
Rebuke was still paid for, so the Servitors won’t be amounting to much next turn either.
Turn 4
Cryx
I can make a desperate play to destroy the objective, but I deem it too risky, because I need to commit Skarre to Hellfire and use Sacrificial Strike with a Servitor, exposing her if it doesn’t work. So instead I do what I can and relocate my caster to the other side.
Deneghra charges the Judicator, which still has Curse of Shadows on it and does what she can, which is not a lot. Aiakos uses Deathbringers to kill a single Initiate, because he’s affected by Awe.
The Captain knocks down the Avatar and contests the zone while my far right Warwitch and Stalker fan out to be a harder target. The rest of my models, including the Servitors just continue to contest the zone and flag.
Protectorate
Deneghra dies to Harbinger and the Archon kills Aiakos and a Servitor. The Avatar takes out the last Satyxis after standing up and the Avatar walks to contest the zone, but with his crippled side, can’t kill my objective, nor can he reach my Stalker.

Rest
The rest of the game isn’t very interesting anymore. The Servitors continue to do their best to contest, but both die to the Archon next run as they need to stay within 4” of each other (actually, I could’ve spread them out and the last remaining one would always be the unit commander and contest)
I manage to finish off the Judicator between the Warwitch, the remaining Stalker and a well placed Hellfire, but that’s all I have left, so my opponent grinds out the game.
Test feedback
Asphyxious the Sanctified
Note that this was played with week 2 rules, but it barely mattered as all attacks on Asphyxious (auto-)hit anyway. I was going to say he might still be a bit too durable, but that can’t be seen from this game. I feel like his new rules are a good middle ground, allowing MAT 7 to occasionally hit unboosted and lower MAT scores to boost to hit more reliably.
His offensive output still needs to be respected, but he was well controlled in this game and I couldn’t leverage him to his full potential, even though his onslaught on the Judicator did assist me in eventually killing it.
The Dark Shroud was occasionally useful, especially on his jacks to hit slightly above their weight class.
Bloodthirst didn’t come up at all, as it gives me the same threat range as simply jumping with my Stalkers and I couldn’t afford to charge if I wanted to get where I needed to.
The Servitors were only useful to providing Dark Shroud and Gang Fighter on 1 occasion and for the rest did nothing at all.
It’s still difficult to use them while they’re tethered to Asphyxious, even with his respectable CMD of 9, but again, that’s probably fine. They’re almost completely useless after he dies though, having victim stats as well as losing all of their utility of replenishing and applying Dark Shroud. At least they can still score a zone.
Summary
In summary, I must say I really enjoyed playing Asphyxious 4 and he will be a great addition to some of our lists. Balancing factors are that he’s a hefty investment and if you overcommit, you will definitely lose him, as well as the battlegroup. The fact that he is “held back” by himself and his Servitors wanting to do different things, also helps to not make him feel overbearing, though it did feel a little too clunky.
I especially like the Deneghra 2 list, because it opens up so many extra threat/assassination angles, it’s mind boggling.
I can also see him doing well with Venethrax, to really stack the living hate while perhaps offering some ranged support and being a powerful late game piece.
He did feel like a case of “win more” with Skarre 1, possibly overkill.
I personally don’t feel like you want to build lists just around him, with your “real” caster being support, like some people had suggested. The fact is that he wants to take jacks, but more so that they can support the rest of your army with unique abilities and/or Dark Shroud. Except for effectively having “Field Marshal [Dark Shroud]”, he doesn’t really do much for his battle group, and even then is a support ability for the rest of your army. Being FOC 5 also makes it difficult to run a large battle group on him in the first place.
